Table of contents
- What is Server Side Tracking and what are its benefits?
- Difference between client side and server side tracking
- How much additional data do I generate with Shopify server side tracking?
- Use case 1: Facebook - Extra data in dashboard
- Use case 2: TAGGRS - Extra data in dashboard
- Use case 3: Google Ads - Extra data in dashboard
- Implement Shopify Server Side Tracking with Google Tag Manager
- Setting up platforms in Google Tag Manager
- Shopify Template Download & Import
- What to look out for:
- Additional tools to optimize your tracking

What is Server Side Tracking and what are its benefits?
Server side tracking is a method where data is collected directly from the server rather than through the user’s browser.
Advantages:
- More data for your campaigns: Collecting data from the server provides a more complete picture of user behavior.
- More accurate data: Server side tracking reduces the chance of data loss and errors.
- GDPR compliant: Data can be stored and processed more securely and in accordance with privacy legislation.
- Faster website: Less reliance on external scripts results in faster load times, which is beneficial for conversion rates.
- Longer cookie life: Server side cookies have a longer lifespan than browser cookies.
- Bypass Adblockers: Server side tracking is not blocked by adblockers, allowing you to collect more data.
Difference between client side and server side tracking
You may already be used to working with Google Tag Manager and have a setup there. It most likely works via the client side method. Client side tagging is a method where data is collected via the user’s browser and sent to the server.
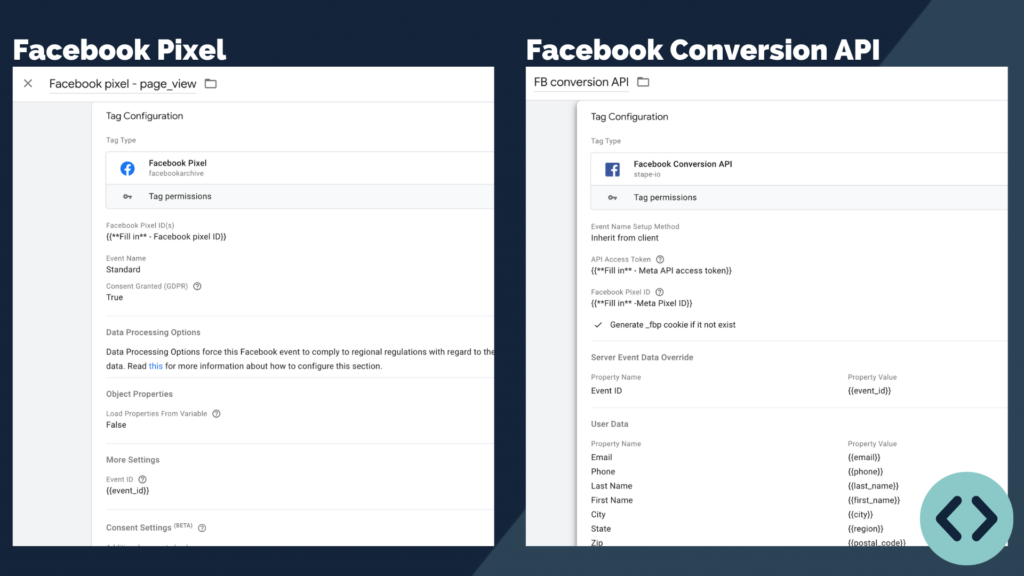
The challenging part is that everything has to be set up a little differently with Server Side Tracking (server container). Where you might be used to setting up the Facebook pixel, in the server container this becomes the Facebook Conversion API.
As you can see, this setup is structured a little differently.
Not used to working with Google Tag Manager yet? No problem! With our templates and guides you will figure it out yourself.
How much additional data do I generate with Shopify server side tracking?
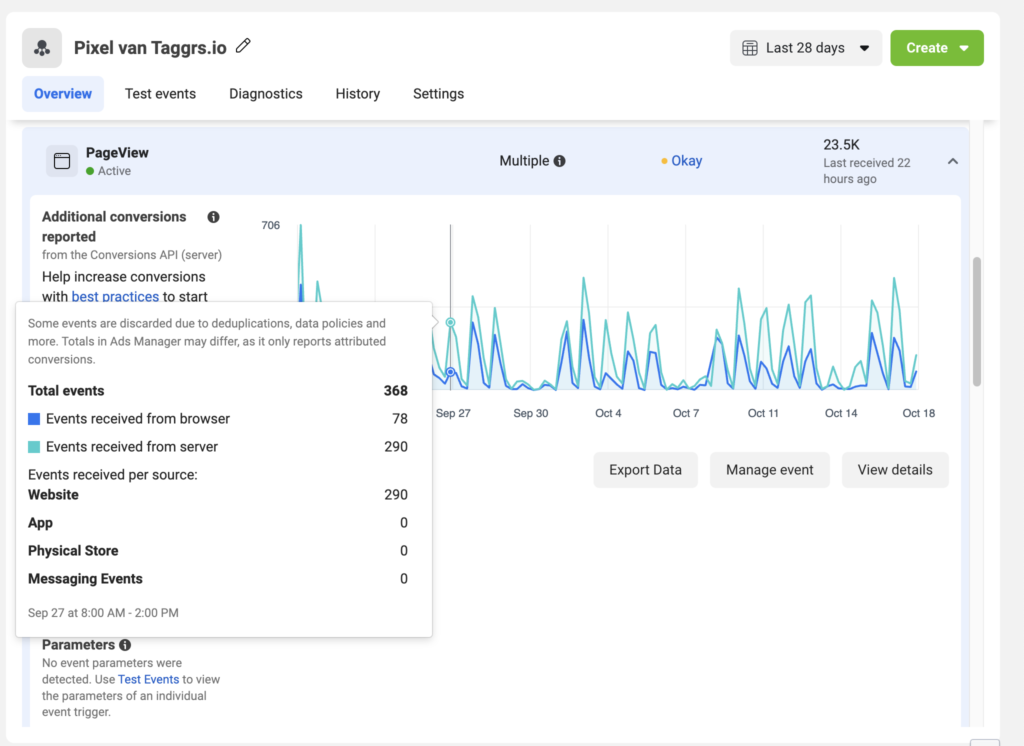
Use case 1: Facebook - Extra data in dashboard
In the graphs on the right you see two events that are measured via the Meta Ads pixel. The difference between the measurements via the browser and the measurements via the server is clearly visible. The green line represents the server events and the blue line the browser events. In this example this leads to 22% extra data.
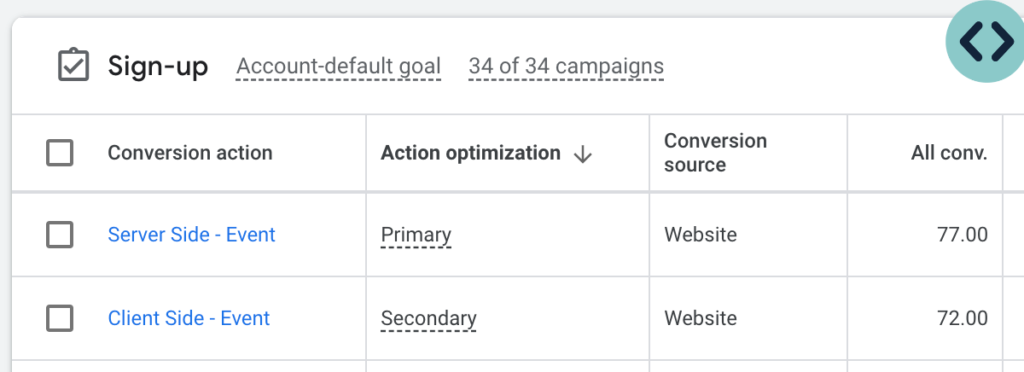
Use case 2: Google Ads - Extra data in dashboard
For testing, it is recommended to run your new server side tracking configuration parallel to your current setup in the web container. Server side conversion often reports fewer conversions in the first two weeks because it does not have historical data yet. Once the server side tracking is measuring correctly, you can set the server side tracking conversions as primary and remove or set the web container conversions to secondary.
You can then see the difference in the number of measured conversions in the Google Ads dashboard.
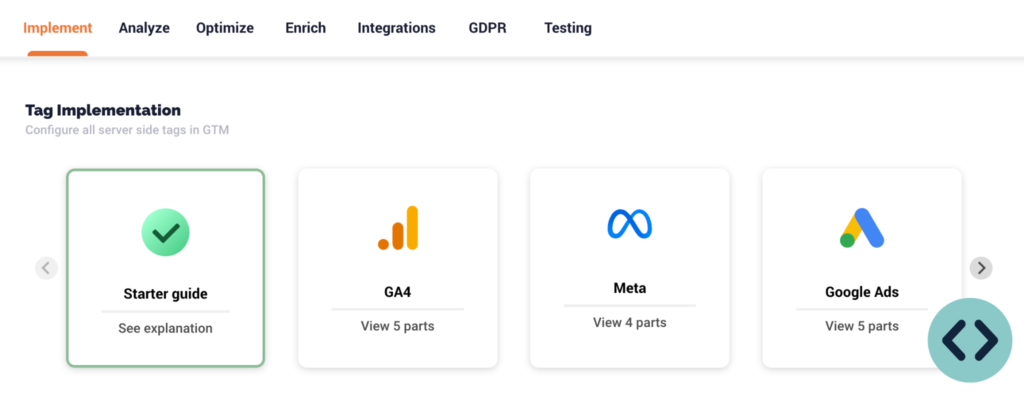
Implement Shopify Server Side Tracking with Google Tag Manager
Now that you know what server side tracking is and what its benefits are, it’s time to set it up.
To get you off to a good start, we’ve created a handy checklist for you to follow.
Before you can start with Server Side Tracking, the following points must be set up:
- Create a GA4 account and link it to your Google Tag Manager account
- Add a Shopify Datalayer to your website .
Tip: Download the free TAGGRS Shopify Data Layer app for a fully compatible and efficient data layer on your website.
Next, you need to create an account and container on TAGGRS. If you want to work with server side tracking, you need a hosting provider. This ensures that the data can run through the servers (Server Side).
Setting up platforms in Google Tag Manager
After you have covered the above points, you need to set up the platforms in Google Tag Manager that you want to measure. You have two options for this:
- Manual configuration
- Using preconfigured templates .
For full control over your tracking setup, you can choose to configure everything manually. This is ideal for businesses looking to migrate or refine their existing tracking infrastructure. These configuration guides can be found within your TAGGRS Dashboard.
The fastest way is to use TAGGRS Templates. TAGGRS offers an extensive template gallery with pre-configured server side tracking templates for popular content management systems, including Shopify. These templates speed up the implementation process and are fully customizable to your business needs.
In this case we are going to use the templates. We are going to set up Server Side Tracking for the following platforms:
- GA4
- Google Ads
Additional tools to optimize your tracking
To further optimize your tracking, you can use specific TAGGRS tools . For example, if you are experiencing tracking prevention by Apple, such as with the iOS 16.4 update, you can install our cookie recovery tool and a Server Side CDN . These tools will help you reduce tracking issues and improve the quality of your data.

Saifur Shahin
🥇Certified Web Analytics & Server Side Tracking Specialist
Company Details
- Webdatasolve
- Registration code : 15457851
- Address : Dhaka Bangladesh-1200
- +8801312072348
- info@webdatasolve.com